
티스토리 뷰
[문제] 12월 17일 (익명 함수, 리턴 함수, @ModelAttribute, 스프링 redirect / get 방식 / post 방식)
WhaleTREE 2021. 12. 17. 17:49
1.JS 에서 아래를 설명하시오.
-익명함수
함수명 대신 변수명에 함수 코드를 저장하는 구현 방식이다. 익명 함수의 소스 코드는 변수값이므로 끝에 세미콜론 ; 을 대입한다. 익명 함수는 호출 시 변수명을 함수명처럼 사용하면 된다.
var 변수명 = function( 매개변수 ) {
실행문; ( 또는 return 반환값(반환 함수); )
};
익명 함수는 함수 코드가 변수명에 저장된 형태이다.
따라서 변수값으로 구성된 함수 코드를 다른 변수명에 마치 변수를 대입하듯이 이동시킬 수 있다.
|
1
2
3
4
5
6
7
8
9
10
11
|
//익명 함수 선언
var apple = function( ) {
document.write("This is a banana.");
};
//변수명 교체
var banana = apple;
//변경된 변수명으로 함수 호출
banana( );
// result : This is a banana.
|
cs |
|
1
2
3
4
5
6
7
8
9
10
11
12
13
14
15
|
function funName(){
console.log("명시적 선언입니다.")
} // 데이터 타입 없이 function 함수명() { 바디 }
var funAnonymous = function(){ // 함수명이 없어도 된다. 왜냐하면 어차피 메모리에
// 주소값으로 올라가 있기 때문?
console.log("익명함수 입니다.");
};
/* 함수 실행 방법! */
funName();
// 명시적 선언입니다.
funAnonymous();
// 익명함수 입니다.
|
cs |
-명시적 함수
자바에서 배웠던 함수와 동일하다! 사용도 자바에서 쓰던 함수 호출방식과 같다.
-위의 두함수의 차이
명시적 함수는 자바스크립트가 처음 읽힐 떄 해석되므로(메모리에 저장?), 함수가 쓰여진 위치가 상관없다. 이를 호이스팅이라고 한다. 호이스팅은 자바스크립트가 처음 읽힐 때 모든 객체(변수, 함수)의 선언부를 맨 위로 끌어올리는 것이다. 명시적 함수는 함수 전체(함수명, 함수바디)가 통째로 호이스팅 되어 맨 위로 올라가기 때문에 위치 상관없이 함수를 사용할 수 있다. (함수 호출이 함수 선언보다 윗줄에서 이루어져도 함수가 실행된다.)
|
1
2
3
4
5
6
7
8
9
10
11
12
13
14
15
|
fun1(); // fun1 run! 정상 실행
// fun2(); 실행 오류
// 명시적 함수는 생성 전에 함수를 호출해도 사용가능하다.
function fun1(){
console.log("fun1 run!");
}
// 익명함수는 주소 값(4byte)으로 저장되기 때문에
// 무조건 함수 선언이 먼저 이루어져야 함수 사용 가능
var fun2 = function(){
console.log("fun2 run!");
}
fun2(); // fun2 run! 정상 실행
|
cs |
https://velog.io/@blackb0x/%EC%9D%B5%EB%AA%85%ED%95%A8%EC%88%98Anonymous-function
익명함수(Anonymous function)
자바스크립트 익명 함수는 함수명 대신 변수명에 함수 코드를 저장하는 구현 방식이다. 익명 함수의 소스 코드는 변수값이므로 끝에 세미콜론 ; 을 대입한다. 익명 함수는 호출 시 변수명을 함
velog.io
https://dev-note-97.tistory.com/273
[Javascript] 일반 함수 vs 익명 함수
자바스크립트는 유연한 언어이다. 따라서 다른 일반적인 언어(Java, C)와 다르게, 함수를 선언하고 사용하는데 있어 굉장한 자유로움이 주어진다. 이는 능숙한 사람에게는 굉장한 이점으로 주어
dev-note-97.tistory.com
2. JS로 아래의 프로그래밍을 하시오.
- 국영수 입력 받아 출력 합계 평균 수우미양가 출력
- 합계 구하는 함수-
- 평균 구하는 함수
- 수우미양가 함수
위의 함수를 모두 익명함수로 만들것
|
1
2
3
4
5
6
7
8
9
10
11
12
13
14
15
16
17
18
19
20
21
22
23
24
25
26
27
28
29
30
31
32
33
34
35
36
37
38
39
40
|
<script>
var kor = Number(prompt("국어 점수를 입력하세요.", 0));
document.write("국어: " + kor + "<br>");
var eng = Number(prompt("영어 점수를 입력하세요.", 0));
document.write("국어: " + eng + "<br>");
var math = Number(prompt("수학 점수를 입력하세요.", 0));
document.write("국어: " + math + "<br>");
var sum = function () {
return kor + eng + math;
};
document.write("총점 :" + sum() + "<br>");
var avg = function () {
return sum() / 3.0;
};
document.write("평균 :" + avg() + "<br>");
var avgGrade = function () {
var grade;
if(avg() >= 90)
grade = "수";
else if(avg() >= 80)
grade = "우";
else if(avg() >= 70)
grade = "미";
else if(avg() >= 60)
grade = "양";
else
grade = "가";
return grade;
}
document.write("평균 등급 :" + avgGrade() + "<br>");
</script>
|
cs |

3. 리턴 함수란?
반환 값이 있는 함수입니다. return이라는 키워드를 이용하여 함수의 결과값을 출력하는 방법이다. return은 함수의 실행을 강제종료 한다. 따라서 reture문 아래의 로직은 작동하지 않는다.
|
1
2
3
4
5
6
7
8
9
10
11
12
13
14
15
16
17
18
19
20
21
22
23
24
25
26
27
28
29
30
31
32
33
34
35
36
37
38
39
40
41
42
43
44
45
|
/*함수 반환(return function)*/
// 구구단 x단 출력
var returnFun = function(x){ // 익명함수
for(var i = 1; i < 10; i++){
console.log(x + " * " + i + " = " + (x*i));
}
}
returnFun(3);
// 자바스크립트에서는 함수를 반환하는 것도 가능!
function funName3(){
return function(x){
for(var i = 1; i < 10; i++){
console.log(x + " * " + i + " = " + (x*i));
}
}
}
// 사용법
var fun3 = funName3(); // 먼저 함수를 호출해 변수에 저장
fun3(4); // 해당 변수를 함수명으로 해서 매개변수 값을 넣는다.....?
/*석탑.....하...기 싫..다...*/
function returnTower(){
return function(x){
for(var i = 1; i <= x; i++){
for(var j = i; j < x; j++){
document.write(" ");
}
for(var j = 1; j <= (2 * i - 1); j++){
document.write("*");
}
document.write("<br>");
}
}
}
var tower = returnTower();
tower(5);
|
cs |
4. 스프링 에서 아래의 설명하시오.?
- @ModelAttribute
커맨드 객체의 이름을 변경할 때 사용한다. (메소드 파라미터 안에 @ModelAttribute("객체명"))
Corntroller 안내 해당 함수를 작성.
|
1
2
3
4
5
6
7
8
9
10
11
12
13
14
15
16
17
|
// http://localhost:8282/ex/studentView?name=Rose&age=22
@GetMapping("/studentView") // view폴더 바로 밑에 생성
public String studentView(@ModelAttribute("studentInfo") StudentInformation studentInformation) {
logger.info("studentView()...");
System.out.println(studentInformation); // 해당 클래스의 toString 함수 실행
// 오버라이딩이 안되 있으면 주소를 뿌리는데
// 롬복으로 toString을 오버라이딩 해줬기 때문에 객체에 저장된 값을 출력!
// model.addAttribute("studentInformation", studentInformation);
// 커맨드 객체가 이것까지 자동으로 넣어준다.
// 그런데 객체 이름이 너무 길어 불편하니 @ModelAttribute("studentInfo")를
// 사용하면 studentInformation 대신 studentInfo로 사용할 수 있다.
// model.addAttribute("studentInformation", studentInfo); 라는 뜻
return "studentView";
}
|
cs |
★ 객체 이름을 처음부터 stduentInfo로 사용할 수는 없는 걸까?
→ 스프링이 생성해 주는 커맨드 객체의 경우 이름이 클래스 이름의 첫글자를 소문자로 변경한 이름이 자동으로 설정된다. 따라서 객체명을 변경하고 싶다면 @ModelAttribute를 사용해야한다.
studentView.jsp
|
1
2
3
4
5
6
7
8
9
10
11
12
13
|
<%@ page language="java" contentType="text/html; charset=UTF-8"
pageEncoding="UTF-8"%>
<%@ taglib uri="http://java.sun.com/jsp/jstl/core" prefix="c" %>
<html>
<head>
<title>studentView</title>
</head>
<body>
이름 : ${studentInfo.name}<br>
나이 : ${studentInfo.age}<br>
</body>
</html>
|
cs |
그 외에도 View(.jsp)에서 사용할 데이터를 설정하는 용도로도 사용된다. (메소드 위에 선언하는 방식으로 사용)
클라이언트 측에서 전달한 값 (input으로 전달된 값, .jsp에서 파라미터 값으로 전달된 값)이나 .jsp에서 사용할 값을 Model 개체에 넣어 .jsp에서 사용할 수 있도록 해준다. (@RequestMapping 메소드 보다 먼저 실행되서 메모리에 올라가기 때문에!)
→ Controller와 같은 역할을 한다고 보자! 다만 차이점은 Model 객체를 이용해 값이 저장된다는 것이다.
자세한 내용은 게시판 할 때 배우게 되지 않을까....?
스프링 퀵 스타드 385p 참고하기.
Spring - MVC @ModelAttribute의 다른사용방법
Spring - @ModelAttribute의 다른 사용법 @ModelAttribute Spring 2.5 부터 지원 @RequestMapping을 사용한 Handler Method Argument에 사용 @Controller or @ControllerAdvice를 사용한 클래스에서 Model 정보를..
ncucu.me
https://cornswrold.tistory.com/316
[Spring] @ModelAttribute, @RequestAttribute
Controller 파라미터에 붙는 자주사용되는 위 두개의 어노테이션을 정리해보자 @ModelAttribute @ModelAttribute와 @RequestParam의 다른 점은 RequestParam은 파라미터를 1:1로 받는 반면, ModelAttribute는 도메..
cornswrold.tistory.com
- redirect 시키는 방법
|
1
2
3
4
5
6
7
8
9
10
11
12
13
14
15
16
17
18
19
20
21
22
23
24
25
26
27
28
29
30
31
32
33
34
35
36
37
38
39
40
|
import javax.servlet.http.HttpServletRequest;
import org.springframework.stereotype.Controller;
import org.springframework.ui.Model;
import org.springframework.web.bind.annotation.GetMapping;
@Controller
public class RedirectController {
// redirect - 유저로 하여금 다시 치고 들어오도록 하게 하는 것!(주소창 주소가 바뀐다.)
// request, response 객체가 새로 생성되기 때문에 request로 파라미터 값 공유 불가.
@GetMapping("/studentConfirm")
public String studentConfirm(HttpServletRequest request, Model model) {
String id = request.getParameter("id");
if(id.equals("abc")) {
return "redirect:studentOK"; // redirect의 경우 url주소(경로)를 의미한다.
} // studentOK.jsp가 아니다!!
return "redirect:studentNG";
}
// http://localhost:8282/ex/studentConfirm?id=abc일 경우 실행
@GetMapping("/studentOK")
public String studentOK() {
return "student/studentOK";
}
// http://localhost:8282/ex/studentConfirm?id=abc가 아닐 경우 실행
@GetMapping("/studentNG")
public String studentNG() {
return "student/studentNG";
}
}
|
cs |
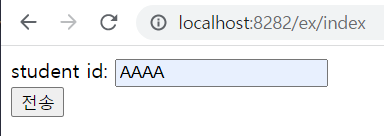
- get 과 post 처리 방법
|
1
2
3
4
5
6
7
8
9
10
11
12
13
14
15
16
17
18
19
20
21
22
23
24
25
26
27
28
29
30
31
32
33
34
35
36
37
38
39
40
41
42
43
44
45
46
47
48
49
50
51
|
import javax.servlet.http.HttpServletRequest;
import org.slf4j.Logger;
import org.slf4j.LoggerFactory;
import org.springframework.stereotype.Controller;
import org.springframework.ui.Model;
import org.springframework.web.bind.annotation.GetMapping;
import org.springframework.web.bind.annotation.ModelAttribute;
import org.springframework.web.bind.annotation.PostMapping;
import edu.kosmo.ex.vo.StudentInformation;
@Controller
public class HomeController {
private static final Logger logger = LoggerFactory.getLogger(HomeController.class);
// 스프링에서 콘솔창 출력을 위해 사용 하는 객체! System.out.println()과 비슷한 역할을 한다.
// 사용방법은 위에 처럼 static final을 붙여주고 객체를 생성해 사용한다.
// System.out.println()과 다른 점은 log4j.xml을 이용해
// 출력 위치, 출력 형식, 출력 레벨(레벨에 따라 출력 여부가 결정된다.)을 개발자가 원하는데로 바꿀 수 있다.
// 자세한 내용은 복잡해서 일단 logger.info()를 System.out.println()처럼 사용할 수 있다는 것만..
// https://kingofbackend.tistory.com/67 참고
// method="get" 이라는 뜻이다.
@GetMapping("/index") // @GetMapping을 써도 된다!
public String goIndex() {
return "index";
}
//student.jsp로 보내겠다. post 방식으로
// action="student" , method="post"
// @RequestMapping(value = "student", method = RequestMethod.POST)
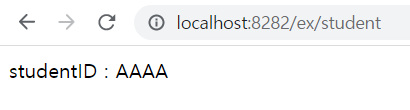
@PostMapping("/student") // 이렇게 하면 위보다 훨씬 간결해진다.
public String studentPost(HttpServletRequest request, Model model) {
logger.info("student()...POST");
String id = request.getParameter("id");
// index.jsp form태그에서 전달 받은 값
logger.info("아이디" + id);
model.addAttribute("studentId", id);
return "student/studentId"; // student/studentId.jsp에서 보여주겠다.
// 다만 여기서는 post방식이라 전달되는 파라미터 값이 주소창에서 보이지 않는다.
// 바로 http://localhost:8282/ex/student 로 주소창에 입력해서 접근하면
// 에러 405번 - method not allowed 발생. (값 전달 방식 설정이 일치하지 않는다.)
// 또는 get방식으로 지정하고 @PostMapping을 사용해도 405에러 발생.
}
}
|
cs |
index.jsp
|
1
2
3
4
5
6
7
8
9
10
11
12
13
14
15
16
|
<%@ page language="java" contentType="text/html; charset=UTF-8"
pageEncoding="UTF-8"%>
<%@ taglib uri="http://java.sun.com/jsp/jstl/core" prefix="c" %>
<html>
<head>
<title>Index</title>
</head>
<body>
<form action="student" method="post">
student id: <input type="text" name="id"><br>
<input type="submit" value="전송">
</form>
</body>
</html>
|
cs |
studentId.jsp
|
1
2
3
4
5
6
7
8
9
10
11
12
13
|
<%@ page language="java" contentType="text/html; charset=UTF-8"
pageEncoding="UTF-8"%>
<%@ taglib uri="http://java.sun.com/jsp/jstl/core" prefix="c" %>
<html>
<head>
<title>studentId</title>
</head>
<body>
studentID : ${studentId}
</body>
</html>
|
cs |
개별진척도
js 5번
basic 석탑 찍기를 리턴 함수로 만들어서 하시오
46번
public static void main(String[] args) {
Box7<Integer> box1 = new Box7<>();
box1.set(99);
Box7<Integer> box2 = new Box7<>();
box2.set(55);
System.out.println(box1.get() + " & " + box2.get());
swapBox(box1, box2);
System.out.println(box1.get() + " & " + box2.get());
}
출력 =========================================
99 & 55
55 & 99
'수업문제' 카테고리의 다른 글
| [문제] 12월 22일 (Spring 게시판, JS 생성자) (0) | 2021.12.22 |
|---|---|
| [문제] 12월 20일 (Spring emp list TO DO list) (0) | 2021.12.20 |
| [문제] 12월 16일 (커맨드 객체, 롬복, 자바 스크립트 함수) (0) | 2021.12.16 |
| [문제] 12월 15일 (pom.xml, @RequestMapping, Model, maven repository, mutable 함수 , immutable 함수) (0) | 2021.12.15 |
- Total
- Today
- Yesterday
- SOCKET
- 세션
- 부트스트랩
- Request
- equals
- compareTo
- Servlet
- 예외처리
- string
- 진척도 70번
- 입출력
- Generic
- JSP
- abstract
- response
- object
- 쓰레드
- Session
- TreeSet
- hashset
- 제네릭
- 사칙연산 계산기
- 래퍼 클래스
- toString
- 참조형
- 채팅
- 쿠키
- el
- exception
- 프로토콜
| 일 | 월 | 화 | 수 | 목 | 금 | 토 |
|---|---|---|---|---|---|---|
| 1 | 2 | 3 | 4 | |||
| 5 | 6 | 7 | 8 | 9 | 10 | 11 |
| 12 | 13 | 14 | 15 | 16 | 17 | 18 |
| 19 | 20 | 21 | 22 | 23 | 24 | 25 |
| 26 | 27 | 28 | 29 | 30 | 31 |